Arduino audio
Do you want to be able to supply a constant 5 V and create a tone? Get a 5V active buzzer.
Do you want a tiny speaker at 5 V? Buy a 5V passive buzzer. It is cheaper than an active buzzer, though both are very cheap.
At this point, we can easily create single-frequency sounds on your passive buzzer using the tone() function. You can play a song (code provided in description)! I made songCreator.ino so that we can make our own songs! I also made sounds.ino to make a few quick interesting sounds, and I made bitBangingAudio.ino to create some cool sounds using math!
Do you want to use tone() on more than one passive buzzer or speaker? Go to Manage Libraries and install ToneLibrary, but you can only create as many tones as there are hardware timers in your Arduino. You will need a different buzzer/speaker for each tone.
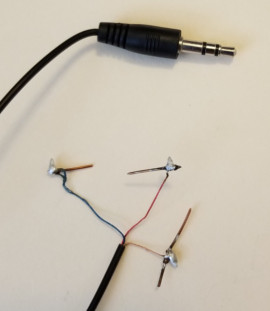
Do you want to control powered desktop speakers? Take an old spare 3.5mm jack cable, cut it and strip near the end you cut. Plug the male jack into the speaker, and solder the stripped end to pieces of 22-gauge copper wire for inserting into a breadboard. My photo of my stereo audio cord shows three wires: bare is GND, red is left speaker, and blue is right speaker.
The voltage is that of line level, which is not more than 2 V peak-to-peak (less for quieter sound), so you'll need a voltage divider. Or, better yet, use a single resistor. Measure the voltage across a large-enough resistor starting at 1 MΩ, then replace with smaller resistances stopping before you get down to 3 V = 5 V - 2 V. My speaker takes significantly less than 1 mA to control the line-level speaker's amplifier, and I use a 100 kΩ resistor.
Do you want to control the Arduino using sound signal from a computer or from a mobile device? For a typical 16 MHz Arduino, I read that the ADC, how analogRead() works, can sample no faster than 9515 Hz. Another limitation is that, without a microSD card and module, there is no way to save/record more than a fraction of a second due to limited SRAM, and, like any RAM, anything saved is deleted when the power is cut (though it is possible to save to a tiny amount of EEPROM, which survives when the power is cut).
However, you can control the built-in LED with audio using my audioIn.ino (in reality, you would probably want to control a strip of addressable LEDs). If you'd like, you can use a breadboard to still play the same audio on powered speakers if you kept the other half of the audio cord! I say that the speakers should be powered because my code only lets us use low-volume signals to the Arduino, so there needs to be an amplifier after the Arduino.
A slight disadvantage of using my audioIn.ino code is that you might fry the Arduino by playing audio at too high a volume (since the Arduino doesn't like negative voltages). We should be careful enough to set master volume of computer low before connecting to the Arduino, so this is only a slight disadvantage, but I have a fix if you want it: see image below and use audioInShifted.ino, looking at the instructions in comments at top of the code.

Do you want to control headphones/earbuds?
Headphone outputs on computers such as the Raspberry Pi use the same voltage as line level, so they can control line level, but can also provide a greater current than line out. Like a passive buzzer, headphones/earbuds don't have a powered amplifier, so they require more current than line level, possibly more current than what an Arduino's output pin can safely deliver! Just like a passive buzzer, instead of directly controlling the headphones, you should control a transistor or use a 220-ohm resistor.
At this point, we can easily create single-frequency sounds on a variety of speakers using PWM.
Do you want to now play actual sound/voice/music on a speaker? Crap like this shield exists, but why wouldn't you just buy a Raspberry Pi for that amount of money? I dislike Arduino shields in general because there is always a more fun option. If I were to ever want to do real sound/music/voices on an Arduino, I would put .wav files on a microSD card, then buy a simple microSD card module. The SD library will communicate with the microSD card, and the TMRpcm library will communicate to the speaker/buzzer via PWM.
Without needing to buy anything like an SD card, this is a fantastic idea using the PCM library to play short snippets of low-quality sound (saved to Arduino using PROGMEM)! To get the PCM library to work on my Arduino Mega, I changed speakerPin = 11 to speakerPin = 10 in...
~/Documents/Arduino/libraries/PCM/PCM.c
If you aren't running macOS, just find where PCM.c is. This works because timer2 of the Mega controls PWM on pins 9 and 10 (not 3 and 11).
The PCM library is limited (not being able to easily change the sample rate, not having a "ramp up" in addition to the "ramp down", not being able to easily loop, etc.), so I put my improved version in a single file: PCM.ino. You no longer need the library! See the comments in the file to learn how to use your own sound! Here are some good sounds...
ArduinoDuemilanove_8k.txt
beep_11k.txt
bird_11k.txt
engine_11k_loop.txt
highpitchsqueal_11k.txt
macstartup_11k.txt
please_help_me_11k.txt
ring_11k.txt
t1_be_back_11k.txt
The one with _loop in the filename is meant to be looped! The ones that have _11k in the filename have a sampling rate of 11025 Hz. Then ones with _8k have a 8000-Hz sampling rate. 16000 Hz and 22050 Hz sound even better, but the length of the sample may be too limited. You can always add a capacitor to make an RC low-pass filter to improve the sound of lower sample rates.
Based on this great idea, here is continuousMusic.ino.
I had a bit of fun recording an 8-bit sound from my computer's headphone jack then recording the same sound (same sample rate) from my Arduino in series with a 100 kΩ resistor. I used the wonderful free software Audacity using line-in jack of my computer. Instead of a line-in jack, you may also be able to use a more common microphone jack, though these are more complicated: are amplified, may supply power, etc. Audacity lets you view the waveform and spectrogram, turning your computer into an oscilloscope! Though, my computer's line-in seems to have frequency filters, so this method only works for frequencies within the audible range (20 Hz to 20 kHz). The Arduino does no interpolation, so, unlike sound from a computer, you see the sample rate in the waveform as the voltage jumps, and the spectrogram shows higher-frequency noise that results from this.
Using an Android smartphone (no mobile/cellular data needed!)
If you have an Android smartphone, you're in luck! If you have an iPhone, you can probably do something similar, but I don't care enough about iPhones to look into it. The main idea here is that the smartphone will be used alongside the Arduino (or Raspberry Pi). That is, the smartphone will not be communicating with the Arduino. You will be able to do 2-way audio and remotely access the smartphone's webcam. The applications of this that I can imagine are making a robot that can act like a walkie-talkie (and can see!) or remotely monitoring any Arduino's environment.
Use the free app IP Webcam on your Android smartphone! Before turning your smartphone into an audio (and video!) server by tapping "Start server" in the app, I reduced the remote video resolution to 720×480 (for no important reason). Once the server is started, make note of the IP address it displays as this is how you can connect to it via any device's web browser. You can freely minimize the app, and it runs in the background until you go back into the app to stop the server. If you plan on running the app for a long time, you can turn off mobile/cellular data to save on battery, or just have the smartphone plugged in. The server most likely cannot be hosted on a cellular network (blame the cellular companies), but it works great over WiFi as long as the client device is on the same network, which can just be the smartphone's hotspot (or a client's hotspot). I made ipWebcamViewer.html to show how to access the one-way audio and video from a custom webpage, which would be very useful if using the same webpage to send commands to an Arduino+ESP8266.
I have tested IP Webcam with several clients in 2018. Firefox on a laptop works great. Chrome on a laptop requires using HTTPS for 2-way audio (just ignore the security warnings). For me, iOS or Safari do not let audio work. Android does not let 2-way audio work (though it kind of worked in a very screechy way using Firefox on Android).
Within the app, you can tap "Cloud streaming" to be able to view the video and audio over Internet (one-way only) using Ivideon (free). There was a significant delay for me. For an even larger delay, use mobile/cellular data! But at least Cloud streaming is a way to get it to work using mobile data allowing your smartphone to be almost anywhere!
Alternative: If you want to connect from any network across the world and if you have Internet access, use Skype on your smartphone. Not only does Skype work if your smartphone is connected via WiFi, but Skype works if your smartphone is only connected via cellular/mobile network. This also lets you do 2-way video and 2-way audio (IP Webcam is 1-way video and 2-way audio). You can't use Skype via just a hotspot (it needs Internet access), you have to have someone near the smartphone when the call starts to start/accept the call, and you are more susceptible to permanently losing connection if temporarily disconnected, but it can work great!
Alternative: If you want 2-way video and your client device is also an Android device, you can use something like the free app Walkietooth. Unlike IP Webcam, you can do 2-way video because both devices are running the same Walkietooth app, but, like Skype, you need someone near the server when the connection to the client starts. Unlike Skype, you connect using local network instead of requiring access to the Internet, and Walkietooth is only available on Android devices.